
RubyでExcelの図形処理を行います。実行を確認した環境は以下となります。
| Rubyのバージョン | ruby 2.4.0p0(ActiveScriptRuby) |
| Excelのバージョン | Excel2010 |
以下に実行例を示します。実行には、excelUtil.rb、wincons.rbが必要です。
# coding: utf-8
# excel 図形操作
require 'win32ole'
require "./excelUtil"
require "./wincons"
cons = Console.new(__ENCODING__)
exlUtil = ExcelUtilt.new()
excel = WIN32OLE.new('Excel.Application')
module MSO; end # excelの定数をロード
WIN32OLE.const_load('Microsoft Office 14.0 Object Library', MSO) # 注意 excelのバージョンで異なる
excel.visible = true # 表示状態とする
workbook = excel.workbooks.add
sheet = workbook.ActiveSheet # アクティブシート選択
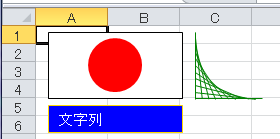
# 長方形追加 図形タイプ, Left, Top, Width, Height
shape = sheet.Shapes.AddShape(MSO::MsoShapeRectangle, 10, 5, 100, 50)
shape.Fill.ForeColor.RGB = exlUtil.rgb(0xff, 0xff, 0xff) # 白色
shape.Line.Weight = 1 # 枠線の太さ
shape.Line.ForeColor.RGB = exlUtil.rgb(0, 0, 0) # 枠線の色
# 円(楕円)追加 図形タイプ, Left, Top, Width, Height
shape = sheet.Shapes.AddShape(MSO::MsoShapeOval, 40, 10, 40, 40)
shape.Fill.ForeColor.RGB = exlUtil.rgb(0xff, 0, 0 ) # 赤色
shape.Line.Visible = false # 枠線無し
# 直線 追加 開始位置x,y 終了位置x,y
0.step(50, 5){|p|
shape = sheet.Shapes.Addline(120, 5 + p, 120 + p, 55)
shape.Line.ForeColor.RGB = exlUtil.rgb(0, 0x80, 0) # 緑色
}
# テキストボックス 追加 文字列の向き, Left, Top, Width, Height
shape = sheet.Shapes.AddTextBox(MSO::MsoTextOrientationHorizontal, 10, 60, 100, 20)
shape.Line.ForeColor.RGB = exlUtil.rgb(0xff, 0xd9, 0) # 枠線黄
shape.Fill.ForeColor.RGB = exlUtil.rgb(0, 0, 0xff) # 背景青
shape.TextFrame.Characters.Text = "文字列"
shape.TextFrame.Characters.Font.Color = exlUtil.rgb(0xff, 0xff, 0xff) # 文字色白
print "qキーで終了¥r¥n"
while true
ca = cons.inkey
if ca[0] == "q" || ca[0] == "Q"
break
end
sleep 0.01
end
workbook.Saved = true
excel.quit
EXCEL定数を使用する場合は、先頭文字を大文字にします。例 msoShapeRectangle → MSO::MsoShapeRectangle
図形のタイプは、MsoAutoShapeTypeを参照して下さい。また、
テキストボックスの文字列向きについては、MsoTextOrientationを参照して下さい。
# 図形の個数取得
icu = sheet.Shapes.Count
print "図形個数:" + icu.to_s + "\r\n"

# 図形の選択
shape = sheet.Shapes(n)       # 順番号で指定 1~
shape = sheet.Shapes("円1")   # 図形名で指定

# 選択図形の削除
shape.Delete

# 図形タイプ取得
ist = shape.type
if ist == MSO::MsoAutoShape
   print "選択図形はautoshape¥r¥n"
end

# autoshapeのタイプ取得
ity = shape.AutoShapeType
if ity == MSO::MsoShapeRectangle
   print "選択図形は四角形¥r¥n"
end

# 図形名
sname = shape.Name            # 図形名取得 文字コードは、Windows-31J です。
print sname + "¥r¥n"
shape.Name = "図形名"         # 図形名設定

# 図形の位置、サイズ
it = shape.Top                # 上端取得
il = shape.Left               # 左端取得
iw = shape.Width              # 幅取得
ih = shape.Height             # 高さ取得

shape.Top = it - 5            # 上端変更
shape.Left = it - 10          # 左端変更
shape.Width = iw * 2          # 幅変更
shape.Height = ih / 2         # 高さ変更

# 塗りつぶし RGB または SchemeColor で指定
shape.Fill.ForeColor.RGB = exlUtil.rgb(0xff, 0, 0) # RGBで指定
shape.Fill.ForeColor.SchemeColor = 10              # 赤 ColorIndex + 7
shape.Fill.Visible = false                         # 塗りつぶし無効(透明) trueで塗りつぶし有効

# 線
shape.Line.Style = MSO::MsoLineSingle              # LineStyle
shape.Line.DashStyle = MSO::MsoLineSolid           # DashStyle
shape.Line.Weight = 1.5                            # 線の太さ
shape.Line.ForeColor.RGB = exlUtil.rgb(0xff, 0, 0) # 線色 RGB または SchemeColor で指定
shape.Line.ForeColor.SchemeColor = 10
shape.Line.Visible = false                         # 非表示 trueで表示

# 図形文字
shape.TextFrame.Characters.Text = "日本12ab"
shape.TextFrame.Characters.Font.Name = "MS 明朝" # 文字フォント
shape.TextFrame.Characters.Font.Size = 12          # 文字サイズ
shape.TextFrame.Characters.Font.Bold = true        # trueで太字 falseで解除
shape.TextFrame.Characters.Font.Italic = true      # trueで斜体 falseで解除
shape.TextFrame.Characters.Font.Color = exlUtil.rgb(0xff, 0, 0) # 文字色 RGB または、 ColorIndex で指定
shape.TextFrame.Characters.Font.ColorIndex = 3

shape.TextFrame.HorizontalAlignment = ExlConst::XlHAlignRight   # XlHAlign 水平方向配置
shape.TextFrame.VerticalAlignment = ExlConst::XlVAlignTop       # XlVAlign 垂直方向配置
参考)